


by Mark Wutka
Amid all the excitement and debate over Java's crossplatform abilities, Java's features as an object-oriented programming language tend to get lost. Java falls somewhere between C++ and Smalltalk on the object-oriented scale. The general structure of Java's classes are similar to C++, but it adds a few more capabilities that are closer to Smalltalk. For example, the interface mechanism allows you to invoke methods in an object without knowing the object's class hierarchy. In C++, you must have a reference to the object's class or one of its superclasses to invoke a method. Smalltalk, of course, allows you the ultimate freedom of invoking any method in any object. This gives Smalltalk GUI designers a huge advantage in creating reusable components.
In Smalltalk, when you add a button to your application, you can tell the button to invoke a specific method in a specific object whenever the button is pressed. If you were allowed to do this in Java, it would look something like this:
public class MyClass extends Applet
{
     public void handleButtonPress()
     {
          // code to handle a button being pressed
     }

     public void init()
     {
          Button myButton = new Button("Press Me", this,
               handleButtonPress);
     }
}
Unfortunately, you can't do this in Java because it doesn't support pointers or references to functions. You can't even do it effectively in C++, and it supports function pointers. This problem is solved in C++ by something called a functor, also known as the Command pattern in design pattern lingo.
The Command pattern addresses the problem of invoking arbitrary methods in an object. The basic mechanism of the Command pattern is that you create small objects that implement a specific interface-each object is responsible for invoking a different method.
Suppose you want to create buttons for your applet and have each button invoke a different method in your applet. You could create your own action method in the applet and handle the action events for the buttons, but that would turn out to be too much work in a larger applet. Instead, you define an interface like the one shown in Listing 9.1:
Listing 9.1 Source Code for Command.java
public interface Command
{
     public void doCommand();
}
Now, to be able to use this interface with a button, you need a subclass of Button that invokes doCommand whenever the button is pressed. Listing 9.2 shows an implementation of a CommandButton object that does this.
Listing 9.2 Source Code for CommandButton.java
import java.awt.Button;
import java.awt.Event;

// This class implements a Button that supports the
// Command interface. When the button is pressed, it
// invokes the doCommand method in the Command interface.

public class CommandButton extends Button
{

// The interface where we will invoke doCommand

     protected Command buttonCommand;

// It's always polite to implement the empty constructor if
// you can get away with it.

     public CommandButton()
     {
     }

// Allow a CommandButton with a command but no label

     public CommandButton(Command command)
     {
          buttonCommand = command;
     }

// Allow a CommandButton to use the typical Button constructor

     public CommandButton(String label)
     {
          super(label);
     }

// The most useful constructor allows a label and a command

     public CommandButton(String label, Command command)
     {
          super(label);

          buttonCommand = command;
     }

// When we get an action event, invoke doCommand in buttonCommand

     public boolean action(Event evt, Object which)
     {

// Make sure the action event is for this object
          if (evt.target != this) return false;

// Make sure we have a buttonCommand defined!
          if (buttonCommand == null) return false;

          buttonCommand.doCommand();

          return true;
     }

// Since you can create a CommandButton without passing it a
// Command interface, you need to be able to set the command later.

     public void setCommand(Command command)
     {
          buttonCommand = command;
     }
}
Now, suppose you want to pass parameters when the command is invoked. For example, suppose you want to assign numbers to buttons and pass the number as part of the command. You do not need to change the Command interface or the CommandButton class for this. The key to the Command pattern is the creation of small command objects that invoke the real methods. Listing 9.3 shows a small command object implementation whose doCommand method turns around and invokes changeNumber in a NumberApplet object.
Listing 9.3 Source Code for ChangeNumberCommand.java
// This class implements a simple command object
// that invokes a method called changeNumber in a
// NumberApplet object whenever doCommand is called

public class ChangeNumberCommand extends Object implements Command
{
     protected NumberApplet applet;
     protected int number;

     public ChangeNumberCommand(NumberApplet applet, int number)
     {
          this.applet = applet;
          this.number = number;
     }

     public void doCommand()
     {
          applet.changeNumber(number);
     }
}
The ChangeNumberCommand object illustrates the key feature of the Command pattern.It acts as an intermediary between the CommandButton and the NumberApplet. The CommandButton says doCommand(), the NumberApplet wants to hear changeNumber(5), the ChangeNumberCommand object performs the translation. Listing 9.4 shows the implementation of the NumberApplet class.
Listing 9.4 Source Code for NumberApplet.java
import java.applet.Applet;
import java.awt.Label;

// This applet displays a label containing a number,
// followed by three buttons which change the number.
// It uses the ChangeNumberCommand to translate the
// doCommand method in the CommandButton to the
// changeNumber method in this object.

public class NumberApplet extends Applet
{
     Label number;

     public void init()
     {
// Start the label out at 0
          number = new Label("0");

          add(number);

// Create the object to change the label to 1
          add(new CommandButton("1",
               new ChangeNumberCommand(this, 1)));

// Create the object to change the label to 2
          add(new CommandButton("2",
               new ChangeNumberCommand(this, 2)));
// Create the object to change the label to 3
          add(new CommandButton("3",
               new ChangeNumberCommand(this, 3)));
     }

// changeNumber actually performs the change

     public void changeNumber(int newNumber)
     {
          number.setText(""+newNumber);
     }
}
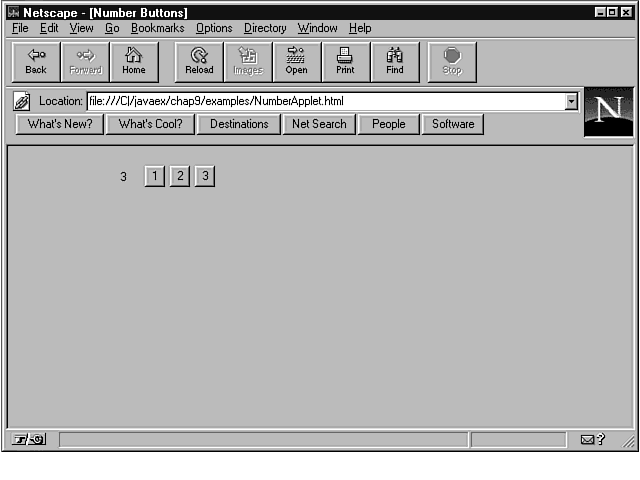
Figure 9.1 shows the NumberApplet applet in action.
Figure 9.1 : The Command pattern makes it easy to use components without subclassing them.
You can also cascade commands, creating command objects that translate from one command into another. For example, the ChangeNumberCommand object invokes a changeNumber method in a NumberApplet that takes a number. It is a shame that the object is restricted to NumberApplets. You will probably have many situations where you want to do a numeric command-a command that takes a number. You should go ahead and define a NumberCommand interface to handle such situations, as shown in Listing 9.5:
Listing 9.5 Source Code for NumberCommand.java
public interface NumberCommand
{
     public void doCommand(int number);
}
Now, because you have already seen an example where you want to take an object that invokes a regular Command and turn that into a NumberCommand, you can feel pretty confident that an object that converts from one to the other will get a lot of use. Listing 9.6 shows the class to do this.
Listing 9.6 Source Code for CommandToNumberCommand.java
// This class translates a Command.doCommand() method into
// a NumberCommand.doCommand(int) method.

public class CommandToNumberCommand extends Object implements Command
{
     protected NumberCommand numberCommand;
     protected int number;

     public CommandToNumberCommand(NumberCommand command, int number)
     {
          this.numberCommand = command;
          this.number = number;
     }

     public void doCommand()
     {
          numberCommand.doCommand(number);
     }
}
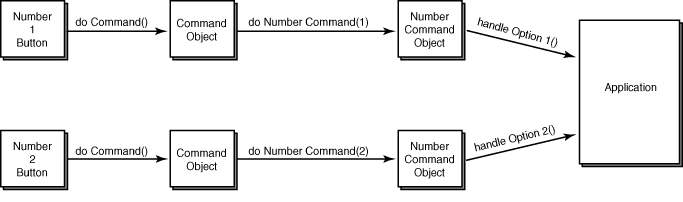
You will soon end up with a library of commands and command conversions, such as StringCommand, StringCommandToNumberCommand, BooleanCommandToStringCommand, etc. You'll also have new components that invoke these commands, like CommandTextField, which would invoke a doCommand method in a StringCommand object. These objects take only minutes to write, but they can save you hours of coding. Figure 9.2 illustrates how some of these objects might be connected.
Figure 9.2 : Different command objects can be linked together like building blocks.
Buttons and menu items are very similar in their usage. In fact, you can think of a menu as a hierarchy of buttons. Both of the components represent an action without any parameters. Components like a choice or an option button have an additional parameter associated with them. For example, with a choice, the parameter is the new item chosen. For an option button, the parameter is whether the button is now selected or deselected. Because of the similarity between Buttons and MenuItems, you can use the same Command interface for both menu items and buttons. This means that you can create buttons that are shortcuts for menu items, both sharing the same instance of a Command object. Listing 9.7 shows an implementation of a CommandMenuItem.
Listing 9.7 Source Code for CommandMenuItem.java
import java.awt.*;

// This is a menu item that supports the command
// interface. Whenever an ACTION_EVENT is posted
// to it, it invokes the doCommand method.

public class CommandMenuItem extends MenuItem
{
// The Command interface to invoke

     protected Command whichCommand;

     public CommandMenuItem(String label, Command whichCommand)
     {
          super(label);
          this.whichCommand = whichCommand;
     }

     public boolean postEvent(Event evt)
     {

// If we get an ACTION_EVENT event, call doCommand
          if (evt.id == Event.ACTION_EVENT)
          {
               whichCommand.doCommand();
               return true;
          }

// Otherwise, let the super class handle the postEvent
          return super.postEvent(evt);
     }
}
The AWT Button class does not allow you to display an image in the button, only text. This is really annoying for people who would like to make toolbars and other useful GUI components. You can implement an image button pretty easily by creating a subclass of Canvas.
When creating a custom component using the Canvas class, there are basically two things you have to do-draw the component and handle input events. For an image button, you also have the added burden of waiting for the image to be downloaded.
The ImageButton class, included
on the CD with this book, implements an image button as a subclass
of Canvas. It does not require
that the image be completely downloaded before the button can
be displayed. Because you don't always know what size a component
needs to be, thanks to the wonder of layout managers, your image
button class needs to be flexible enough to fit into any layout.
You have a choice of keeping the image the same size all the time
and putting some kind of border around the image, or of resizing
the image itself to match the new button size.
| Note |
Whenever you create your own subclass of Canvas, you must set the canvas size either by calling the resize method or by implementing your own minimumSize and preferredSize methods. |
The ImageButton class computes its preferred size from the size of the image. The minimum size is the size of the button when there is no image (4x4, which leaves room for the shadowing effects). The ImageButtonClass also implements its own size method. The size method is used when the button size is fixed. In other words, you can specify a fixed size for the button that will never be changed by the layout manager. Listing 9.8 shows the sizing methods for the ImageButton class.
Listing 9.8 Image Sizing Methods from ImageButton.java
// The minimum size is the amount of space for the shading around the
// edges, plus one pixel for the image itself.

     public Dimension minimumSize()
     {
          return new Dimension(4, 4);
     }

// We'd prefer to have just enough space for the shading (shading takes
// 3 pixels in each direction) plus the size of the image.

     public Dimension preferredSize()
     {
          return new Dimension(buttonImage.getWidth(this)+3,
               buttonImage.getHeight(this)+3);
     }

     public Dimension size()
     {

// If the sized isn't fixed, just say super-size it! (har har)

          if (!fixedSize) return super.size();
          return preferredSize();
     }
| Caution |
If an image hasn't been downloaded yet, the getWidth and getHeight methods will return -1. This can cause unpleasant exceptions if you use these values to set the width or height of a canvas. The ImageButton class does not have that problem because it leaves space on either size of the image. If the image hasn't been downloaded, the preferredSize method will return a dimension of 2¥2. If it hadn't added 3 to both width and height, it would be returning a dimension of -1¥-1, which would surely cause an error. |
The ImageButton class is concerned only with mouse movements. It needs to know when someone selects the button. You might think that you would only need to look for a MOUSE_DOWN event, but it is not that simple. On most systems, if you hold the mouse down and then move the mouse away from the button before releasing the mouse, the button pops up as if you had never clicked it. You often use this functionality if you start to click the wrong button. The ImageButton class needs to handle that case.
In order to allow you to move the mouse away from the button while it is down, you can't trigger the button's action on a mouse click. Instead, you must trigger it when the mouse is released. That way, you need to have the mouse pointer on the button, click the mouse, and release it before you actually perform the button's action.
If you were to only implement the mouseDown and mouseUp events, you'd still have one problem. You need to make the button pop back up when the mouse leaves the button area. This means that the ImageButton class must also implement the mouseExit method. If it did not implement this method, whenever you moved the mouse away from the button, the button would appear to be stuck in the down position.
It would be really nice if you could watch for the mouse entering the button's area and have the button notice whether the mouse was up or down and adjust accordingly. Unfortunately, the MOUSE_ENTER and MOUSE_EXIT events do not give any indication of whether the mouse is up or down. The reason this is nice is that most buttons will automatically pop down if you move the mouse over them while you are holding the mouse button down. If you try this with the image button, you'll see that it does not do this.
Listing 9.9 shows the mouse event handlers for the image button class. The mouse event handlers manipulate a Boolean variable called isDown, which keeps track of whether the button is currently up or down. This value is then used by the paint method to determine whether the button should be drawn up or down.
Listing 9.9 Mouse Handling Methods from ImageButton.java
 // If we get a mouse click, make a note it and push the button down

     public boolean mouseDown(Event evt, int x, int y)
     {
          isDown = true;
          repaint();
          return true;
     }

// If we get mouseUp, see if we thought the mouse was down. If so,
// the button has been clicked. Generate an action event so this button
// behaves just like a real button.

     public boolean mouseUp(Event evt, int x, int y)
     {
          if (isDown) {
               Event newEvt = new Event(this, evt.when,
                    Event.ACTION_EVENT, x, y, 0, 0, buttonImage);
               this.postEvent(newEvt);
          }
          isDown = false;
          repaint();
          return true;
     }

// If the mouse leaves the area, move the button up.

     public boolean mouseExit(Event evt, int x, int y)
     {
          if (isDown) {
               isDown = false;
               repaint();
          }
          return true;
     }
The paint method is the one method that you should always see in a subclass of Canvas. You may not handle mouse events or anything else, but you need to paint the canvas. Otherwise, you'll just get a blank space. For the image button, the painting is interesting.
Most window systems use the same basic effect for creating 3-D effects. You imagine that there's a light shining from the upper-left corner of the screen. Anything on the screen that is raised (coming off the screen towards you) would catch the light on its upper left side, and the lower left side would be in shadow. Anything that is lowered (going inside the screen, away from you) would catch light on the lower-right corner, and the upper-left would be in shade. Also, when a button is lowered, the image or text in the image is usually shifted a small amount to the right and down.
Figure 9.3 shows the image button in the raised position. Notice that the top and left edges are lighter, while the bottom and right edges are darker.
Figure 9.4 shows the image button in the lowered position. Notice that the top and left edges are now darker and the bottom and right edges are lighter.
Listing 9.10 shows the paint method for the ImageButton class. It draws the shading for the upper-left part of the button, then draws the image before adding the shading for the lower-right.
Listing 9.10 paint Method from ImageButton.java
// paint displays the shading and the image

     public void paint(Graphics g)
     {
          Dimension currSize = size();
          int width = currSize.width;
          int height = currSize.height;

          int imgHeight = buttonImage.getHeight(this);
          int imgWidth = buttonImage.getWidth(this);

// Display the shading in the upper left. If the button is up, the
// upperleft shading is white, otherwise it's black

          if (isDown) {
               g.setColor(Color.black);
          } else {
               g.setColor(Color.white);
          }
          g.drawLine(0, 0, width-1, 0);
          g.drawLine(0, 0, 0, height-1);

// If the button is up, we draw the image starting at 1,1

          int imgX = 1;
          int imgY = 1;

// If the button is down, move the image right and down one pixel and
// draw gray shading at 1,1

          if (isDown) {
               g.setColor(Color.gray);
               g.drawLine(1, 1, width-2, 1);
               g.drawLine(1, 1, 1, height-2);
               imgX++;
               imgY++;

// If the button is up, draw gray shading just inside the bottom right shading
          } else {
               g.setColor(Color.gray);
               g.drawLine(1, height-2, width-1, height-2);
               g.drawLine(width-2, 1, width-2, height-2);
          }

// Compare the width of the button to the width of the image, if
// the button is wider, move the image over to make sure it's centered.

          int xDiff = (width - 3 - imgWidth) / 2;
          if (xDiff > 0) imgX += xDiff;

// Compare the height of the button to the height of the image, if
// the button is taller, move the image down to make sure it's centered.

          int yDiff = (height - 3 - imgHeight) / 2;
          if (yDiff > 0) imgY += yDiff;

          g.drawImage(buttonImage, imgX, imgY, this);

// Draw the bottom right shading. If the button is up, the shading is
// black, otherwise it's white.

          if (isDown) {
               g.setColor(Color.white);
          } else {
               g.setColor(Color.black);
          }
          g.drawLine(1, height-1, width-1, height-1);
          g.drawLine(width-1, 1, width-1, height-1);

     }
Rather than requiring that images be completely loaded, the ImageButton class redraws itself when an image finishes loading. To do this, it implements the ImageObserver interface. If you only need to know that an image has finished downloading, you only need to examine the flags parameter to see if the ImageObserver.ALLBITS flag has been set.
When the ImageButton class learns that the image has finished downloading, it resizes itself and calls repaint to redraw itself with the completed image. Listing 9.11 shows the imageUpdate method for the ImageButton class.
Listing 9.11 imageUpdate Method from ImageButton.java
public boolean imageUpdate(Image img, int flags, int x, int y,
          int width, int height)
     {

// If we have a complete image, resize the button and ask the parent
// to recompute all the component positions. Good thing this only
// gets called once!

          if ((flags & ImageObserver.ALLBITS) != 0) {
               resize(img.getWidth(this)+3, img.getHeight(this)+3);
               getParent().validate();
          }

// Let the canvas class handle any other information it was looking for
          return super.imageUpdate(img, flags, x, y, width, height);
     }
| Tip |
Any time a component resizes itself, it should call the validate method in the parent container. This causes the container to reposition its components based on the updated size. |
Now that you have created your own custom component, you can see how easily you can fit it into the Command interface scheme. You only need to create a subclass of ImageButton called CommandImageButton. Listing 9.12 shows you how to do this.
Listing 9.12 Source Code for CommandImageButton.java
import java.awt.Event;
import java.awt.Image;

// This class implements a ImageButton that supports the
// Command interface. When the button is pressed, it
// invokes the doCommand method in the Command interface.

public class CommandImageButton extends ImageButton
{

// The interface where we will invoke doCommand

     protected Command buttonCommand;

// Allow a CommandButton to use the typical ImageButton constructor

     public CommandImageButton(Image image)
     {
          super(image);
     }

// Allow a CommandButton to use the typical ImageButton constructor

     public CommandImageButton(Image image, boolean fixedSize)
     {
          super(image, fixedSize);
     }

// The most useful constructor allows an Image and a command

     public CommandImageButton(Image image, Command command)
     {
          super(image);

          buttonCommand = command;
     }

// The most useful constructor allows an Image and a command

     public CommandImageButton(Image image, boolean fixedSize,
          Command command)
     {
          super(image, fixedSize);

          buttonCommand = command;
     }

// When we get an action event, invoke doCommand in buttonCommand

     public boolean action(Event evt, Object which)
     {

// Make sure the action event is for this object
          if (evt.target != this) return false;

// Make sure we have a buttonCommand defined!
          if (buttonCommand == null) return false;

          buttonCommand.doCommand();

          return true;
     }

// Since you can create a CommandImageButton without passing it a
// Command interface, you need to be able to set the command later.

     public void setCommand(Command command)
     {
          buttonCommand = command;
     }
}
Now you can use the CommandImageButton in all your applications where you were using the CommandButton. The number button application earlier in this chapter needs only a few changes. Listing 9.13 shows a version of the number applet that uses image buttons instead of regular buttons and also uses the CommandToNumberCommand object to convert from a Command to a NumberCommand interface.
Listing 9.13 Source Code for NumberApplet2.java
import java.applet.Applet;
import java.awt.Label;
import java.awt.Color;

// This applet displays a label containing a number,
// followed by three buttons which change the number.
// It uses the ChangeNumberCommand to translate the
// doCommand method in the CommandButton to the
// changeNumber method in this object.

public class NumberApplet2 extends Applet implements NumberCommand
{
     Label number;

     public void init()
     {
          setBackground(Color.gray);

// Start the label out at 0
          number = new Label("0");

          add(number);

// Create the object to change the label to 1
          add(new CommandImageButton(
               getImage(getDocumentBase(), "one.gif"),
               new CommandToNumberCommand(this, 1)));

// Create the object to change the label to 2
          add(new CommandImageButton(
               getImage(getDocumentBase(), "two.gif"),
               new CommandToNumberCommand(this, 2)));

// Create the object to change the label to 3
          add(new CommandImageButton(
               getImage(getDocumentBase(), "three.gif"),
               new CommandToNumberCommand(this, 3)));
     }

// changeNumber actually performs the change

     public void doCommand(int newNumber)
     {
          number.setText(""+newNumber);
     }
}
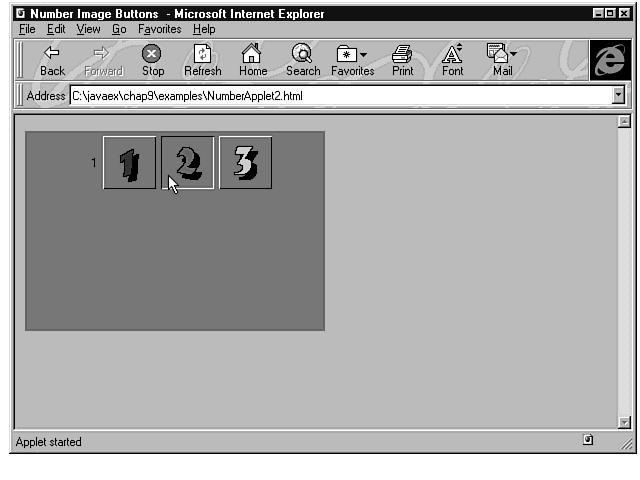
Figure 9.5 shows the NumberApplet2 applet in action.
Figure 9.5 : It is much easier to integrate new components when you use the Command pattern.
The Observer interface and Observable class implement another design pattern called the Observer pattern. While you may not have used these two classes yet, you have seen a similar system in the form of the ImageObserver interface used when dealing with images. The idea behind the Observer interface is that you may have an object that wants to know when another object changes. For instance, you may be displaying a car's speed and need to know when the speed changes. Rather than creating a loop that constantly asks the car how fast it's going, you simply ask the car to tell you when its speed changes. It's a simple mechanism, but it can have a huge impact on your design.
The reason the Observer interface is so effective is that it uses the Model-View-Controller (MVC) paradigm. The idea behind MVC is that an application really consists of three things-a model, some views of the model, and some controllers.
The model is the part of the application that contains the actual application logic. It does the database access, it computes numbers, it manipulates data structures. It is really the heart of your application. When we talk about separating the user interface from the application, the model is the application.
If the model represents the application, then the view and controller represent the user interface. The user interface is conceptually split into input components and output components. A controller is an input component. It supplies information to the model. A view is an output component-it displays information from the model. MVC is not some brand new, untested theory-it is the way Smalltalk applications have been written for many years.
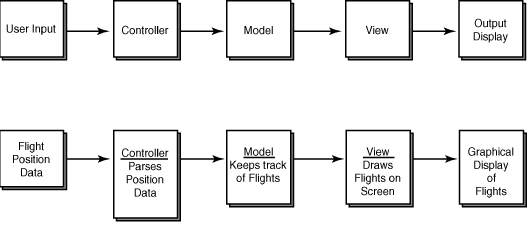
Pay close attention to the interfaces between the model and your views and controllers. It is very easy to let a model perform things that should rightly be part of a view or a controller. For example, suppose you are doing an aircraft tracking system and you are getting flight positions from the FAA over a modem. These positions are in the form of a text message that contains the aircraft identification and current information about it. You would have some code reading these messages from the modem and passing them to another routine that parses the information out of the message. It is very easy to think of the code that reads the messages as the controller, and put the parsing mechanism in the model. It is also wrong. The parsing routine is also part of the controller. The model should have absolutely no dependence on the external representation of information. This is an extremely important point, because it greatly affects the reusability of your code. You should be able to change input sources and change output formats without touching the model. In other words, the model deals with pure information that has no external meaning attached to it.
Figure 9.6 shows the conceptual relationship between the model, the view, and the controller. It also shows how the aircraft tracking system fits into this model.
The Observer interface and the Observable class make it easier for you to create views of data in the model by creating a notification system to let your view know when data in the model has changed. The mechanism is very simple. You create some object in your model that is a subclass of Observable. Anytime this class changes, it calls setChanged to flag itself as having changed, and then calls notifyObservers. The reason for the separation is that you may run through a series of checks in your model, any one of which might change the data. When you have finished, you call notifyObservers one time, rather than notifying the observers after every check. Whether to notify every time or periodically is a design decision.
Listing 9.14 shows an example ObservableInt class which is an Observable version of an integer.
Listing 9.14 Source Code for ObservableInt.java
import java.util.*;

//
// ObservableInt - an integer Observable
//
// This class implements the Observable mechanism for
// a simple int variable.
// You can set the value with setValue(int)
// and int getValue() returns the current value.

public class ObservableInt extends Observable
{
     int value;     // The value everyone wants to observe

     public ObservableInt()
     {
          value = 0;     // By default, let value be 0
     }

     public ObservableInt(int newValue)
     {
          value = newValue;     // Allow value to be set when created
     }

     public synchronized void setValue(int newValue)
     {
//
// Check to see that this call is REALLY changing the value
//
          if (newValue != value)
          {
               value = newValue;

// Mark this class as "changed"
               setChanged();

// Tell the observers about it, pass the new value as an Integer object
// This saves the observers time because they don't have to ask what
// the new value is.
               notifyObservers(new Integer(value));
          }
     }

     public synchronized int getValue()
     {
          return value;
     }
}
On the Observer side of things, you can create components that redisplay themselves when the Observable changes. Listing 9.15 shows an IntLabel class that observes an ObservableInt and displays its current value.
Listing 9.15 Source Code for IntLabel.java
import java.awt.*;
import java.util.*;

// IntLabel - a Label that displays the value of
// an ObservableInt.

public class IntLabel extends Label implements Observer
{
     private ObservableInt intValue;     // The value we're observing

     public IntLabel(ObservableInt theInt)
     {
          intValue = theInt;

// Tell intValue we're interested in it

          intValue.addObserver(this);

// Initialize the label to the current value of intValue

          setText(""+intValue.getValue());
     }

// Update will be called whenever intValue is changed, so just update
// the label text.

     public void update(Observable obs, Object arg)
     {
          setText(((Integer) arg).toString());
     }
}
Listing 9.16 shows an IntTextField that allows you to change the value of an ObservableInt. It will also act as an Observer in case another object changes the value.
Listing 9.16 Source Code for IntTextField.java
import java.awt.*;
import java.util.*;

// IntTextField - a TextField that reads in integer values and
// updates an Observable int with the new value.  This class
// is both a "view" of the Observable int, since it displays
// its current value, and a "controller" since it updates the
// value.

public class IntTextField extends TextField implements Observer
{
     private ObservableInt intValue;

     public IntTextField(ObservableInt theInt)
     {
// Initialize the field to the current value, allow 3 input columns

          super(""+theInt.getValue(), 3);
          intValue = theInt;
          intValue.addObserver(this);     // Express interest in value
     }

// The action for the text field is called whenever someone presses "return"
// We'll try to convert the string in the field to an integer, and if
// successful, update the observable int.

     public boolean action(Event evt, Object whatAction)
     {
          Integer intStr;          // to be converted from a string

          try {     // The conversion can throw an exception
               intStr = new Integer(getText());

// If we get here, there was no exception, update the observable

               intValue.setValue(intStr.intValue());
          } catch (Exception oops) {
// We just ignore the exception
          }
          return true;
     }

// The update action is called whenever the observable int's value changes.
// We just update the text in the field with the new int value

     public void update(Observable obs, Object arg)
     {
          setText(((Integer)arg).toString());
     }
}
Putting these objects together in a working applet is trivial. Listing 9.17 shows an applet that demonstrates these objects.
Listing 9.17 Source Code for ObservableApplet.java
import java.applet.*;

// This class demonstrates the ObservableInt, IntTextField
// and IntLabel classes.

public class ObservableApplet extends Applet
{
     public void init()
     {
          ObservableInt intValue = new ObservableInt(0);

          add(new IntTextField(intValue));
          add(new IntLabel(intValue));
     }
}
The Observer interface is
useful in non-graphical applications, too. It allows you to
create more modular software by reducing the direct interconnection
of components. The Observer
interface is sort of a one-way interaction. The Observers
usually know
what kind of object they're watching, but the Observables
usually just know that there are Observers
watching.
| Caution |
When you use the Observer interface, you gain a lot of flexibility, because objects no longer have to know what objects are watching them. An observed object just sends out a notification that it has changed. You now have a lot of objects that are acting completely on their own, responding to updates and performing their own tasks. You must pay close attention to your object model here. Make sure each object is only performing the tasks it is responsible for. Try to make each object's roles and responsibilities as clear as possible. Otherwise, debugging a system like this will be a nightmare. |
Listing 9.18 shows an example Observable
class that represents an aircraft for a flight tracking system.
Notice that none of its instance variables are public. You need
to be able to notice when a variable changes value. If your instance
variables are all public, any object can come along and change
the value without you being notified. By restricting all the variable
manipulation to accessor functions (get/set
functions), you maintain the ability to notice when a variable
changes.
| Tip |
When you call notifyObservers, you may pass it an object that will be passed to the update method in all observers. You can use this object to pass specific information about the update. If you plan to handle multiple types of updates, you should create an event class, similar to the AWT's Event class, which tells the update method what kind of update it is and which objects are involved. |
Listing 9.18 Source Code for Aircraft.java
import java.util.*;

// This class demonstrates an observable object with multiple
// values that can change. If an individual value is changed,
// it calls notifyObservers. You can also change the values in
// bulk using setAll.
//
// When you create observable classes like this, you can't have
// public variables if you need to know when those varables change.
// Otherwise, if altitude was public, anyone could say:
// aircraft.altitude = 10000;
// and no observers would be notified.

public class Aircraft extends Observable
{
     protected String id;

     protected double latitude;
     protected double longitude;
     protected double altitude;
     protected double speed;

     public Aircraft(String id)
     {
          this.id = id;
     }

     public Aircraft(String id, double lat, double lon, double alt,
          double speed)
     {
          this.id = id;
          this.latitude = lat;
          this.longitude = lon;
          this.altitude = alt;
          this.speed = speed;
     }

     public String getID() { return id; }

     public double getAltitude() { return altitude; }

     public void setAltitude(double newAlt)
     {
          altitude = newAlt;
          setChanged();
          notifyObservers(this);
     }

     public double getLatitude() { return latitude; }

     public void setLatitude(double newLat)
     {
          latitude = newLat;
          setChanged();
          notifyObservers(this);
     }

     public double getLongitude() { return longitude; }

     public void setLongitude(double newLon)
     {
          longitude = newLon;
          setChanged();
          notifyObservers(this);
     }

     public double getSpeed() { return speed; }

     public void setSpeed(double newSpeed)
     {
          speed = newSpeed;
          setChanged();
          notifyObservers(this);
     }

     public void setAll(double lat, double lon, double alt, double speed)
     {
          this.latitude = lat;
          this.longitude = lon;
          this.altitude = alt;
          this.speed = speed;

          setChanged();
          notifyObservers(this);
     }
}
Listing 9.19 shows an example module that watches an Aircraft for changes and prints a warning when the altitude is too high.
Listing 9.19 Source Code for AltitudeMonitor.java
import java.util.*;

// This class demonstrates how you can add new features to an
// application without rewriting a lot of code. In this case,
// this is a module that monitors aircraft altitudes and prints
// out a warning if one gets too high. The aircraft class doesn't
// know anything about this class, their only interaction is
// through the Observer-Observable interface.

public class AltitudeMonitor extends Object implements Observer
{
     double maxAltitude;

     public AltitudeMonitor(double maxAlt)
     {
          this.maxAltitude = maxAlt;
     }

// Somewhere in your application you will have to add code
// to tell this object about new aircraft.

     public void addAircraft(Aircraft newAircraft)
     {
          newAircraft.addObserver(this);
     }

     public void update(Observable obs, Object arg)
     {

// Make sure this update is for an aircraft
          if (!(obs instanceof Aircraft)) return;

          Aircraft ac = (Aircraft) obs;

          if (ac.getAltitude() > maxAltitude) {
               System.out.println("Warning! Aircraft too high!");
               return;
          }
     }
}
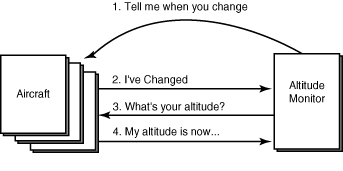
Figure 9.7 shows the relationship between an altitude monitor and an aircraft.
One of the advantages of designing things this way is that AltitudeMonitor could be an add-on feature to your tracking system. You could create whole sets of monitors similar to this that your customer could pick from. Notice, however, there's still one little flaw here. When you add a new aircraft, you have to call addAircraft in the AircraftMonitor object. If you wanted to add new types of monitors, you'd have to call a similar method in the new monitor. This is not good. You want to be able to add a new monitor without adding even one line of code. You can do it, too!
You can create an AircraftRegistry class that is an Observable. Its job in life is to notify its observers whenever a new aircraft is added. Instead of calling addAircraft for each different monitor you have in your system, you just call addAircraft in the registry, and it notifies its observers of the new aircraft. Listing 9.20 shows an implementation of an AircraftRegistry class. It is implemented as a singleton class, which means there is only one in the entire system. A singleton class is implemented by keeping a protected static pointer to the lone instance of the class. You also hide the constructor so no one can create their own instance. Then, you create a static method that returns the lone instance of the class, creating a new one if there wasn't one already.
Listing 9.20 Source Code for AircraftRegistry.java
import java.util.*;


// This class provides a way for aircraft monitors to find out
// about new aircraft. It is implemented as a singleton class, which
// means there is only one. Its constructor is protected, so you
// can't create a new AircraftRegistry manually. Any time you need
// the registry, you access it through: AircraftRegistry.instance()

public class AircraftRegistry extends Observable
{

// reference to the single instance of AircraftRegistry in the system

     protected static AircraftRegistry registry;

     protected AircraftRegistry()
     {
     }

// Return the lone instance of this class. If there isn't one, create it.

     public synchronized static AircraftRegistry instance()
     {
          if (registry == null) {
               registry = new AircraftRegistry();
          }

          return registry;
     }

// When an aircraft is added to the system, notify all the interested parties

     public void addAircraft(Aircraft aircraft)
     {
          setChanged();

// Pass the new aircraft to the interested parties
          notifyObservers(aircraft);
     }
}
Now, the AltitudeMonitor class no longer needs the AddAircraft method. Instead, its update method has to be smart enough to know whether the update came from an Aircraft or from the AircraftRegistry. Listing 9.21 shows the updated AltitudeMonitor class.
Listing 9.21 Source Code for AltitudeMonitor2.java
import java.util.*;

// This class demonstrates how you can add new features to an
// application without rewriting a lot of code. In this case,
// this is a module that monitors aircraft altitudes and prints
// out a warning if one gets too high. The aircraft class doesn't
// know anything about this class, their only interaction is
// through the Observer-Observable interface.
//
// This class uses the AircraftRegistry to learn about new aircraft.

public class AltitudeMonitor2 extends Object implements Observer
{
     double maxAltitude;

     public AltitudeMonitor2()
     {
          maxAltitude = 40000.0;
          AircraftRegistry.instance().addObserver(this);
     }

     public AltitudeMonitor2(double maxAlt)
     {
          this.maxAltitude = maxAlt;
          AircraftRegistry.instance().addObserver(this);
     }

     public void update(Observable obs, Object arg)
     {

// See if this update is for an aircraft

          if (obs instanceof Aircraft) {

               Aircraft ac = (Aircraft) obs;

               if (ac.getAltitude() > maxAltitude) {
                    System.out.println(
                         "Warning! Aircraft too high!");
                    return;
               }

// If this update is from the registry, it is telling us about
// a new aircraft, so start observing the new aircraft

          } else if (obs instanceof AircraftRegistry) {
               Aircraft ac = (Aircraft) arg;
               ac.addObserver(this);
          }
     }
}
This may seem like a lot of fuss to you, but it makes your software much more modular. The AircraftRegistry class provides just the extra level of abstraction to really make this system modular. Now you can add new monitors without changing a line of code anywhere in the program. You can dynamically load new monitors on-the-fly, thanks to Java's class loading interface.
Figure 9.8 shows the relationship between an aircraft, the aircraft registry, and the altitude monitor.
Figure 9.8 : The aircraft registry sends out updates when a new aircraft is created.
Listing 9.22 shows a simple program that tests the interaction between an Aircraft, the AircraftRegistry, and the AltitudeMonitor classes. The monitors array contains a list of the aircraft monitors to be loaded, currently just the AltitudeMonitor2 class. This list could be read in from a file just as easily, so you wouldn't have to recompile even the test program to add new monitors; however, for this demonstration, a static array is sufficient.
Listing 9.22 Source Code for TestMonitor.java
// This class demonstrates the highly dynamic nature of the
// Aircraft, AircraftRegistry, and AltitudeMonitor classes.

public class TestMonitor extends Object
{

// The list of monitors to dynamically load.
     static String monitors[] = { "AltitudeMonitor2" };

// Load the monitors dynamically

     public static void createMonitors()
     {
          for (int i=0; i < monitors.length; i++) {
               try {

// Use the class loader. If the load fails, print an error message, but
// keep running.
                    Class monClass = Class.forName(monitors[i]);
                    monClass.newInstance();
               } catch (Exception e) {
                    System.err.println("Got error creating class "+
                         monitors[i]);
                    System.err.println(e);
               }
          }
     }

     public static void main(String[] args)
     {

// Dynamically load the aircraft monitors
          createMonitors();

// Create a dummy aircraft
          Aircraft ac = new Aircraft("MW1234NA",
               0.0, 0.0, 10000.0, 400.0);

// Add the dummy aircraft to the system
          AircraftRegistry.instance().addAircraft(ac);

// Play with the altitudes and see if the monitor catches it.

          System.out.println("Setting to 12000");
          ac.setAltitude(12000.0);

          System.out.println("Setting to 48000");
          ac.setAltitude(48000.0);
     }
}
The only disadvantage of this program dynamically loading the monitors is that the dynamic loading process can only call the empty constructor for the monitor. You would have to find alternate means of the monitors getting their configuration. Although these examples are fairly specific to a particular application, the concepts apply to a wide range of applications. Use the Observer-Observable interface to separate components as much as possible. You will find that it is much easier to plug in new components.