
This example shows how to encapsulate two widgets into a new component and how easy it is to use many widgets. For the first time, we use a custom widget as a child widget.
/****************************************************************
**
** Qt tutorial 6
**
****************************************************************/

#include <qapplication.h>
#include <qpushbutton.h>
#include <qslider.h>
#include <qlcdnumber.h>
#include <qfont.h>
#include <qvbox.h>
#include <qgrid.h>

class LCDRange : public QVBox
{
public:
    LCDRange( QWidget *parent=0, const char *name=0 );
};

LCDRange::LCDRange( QWidget *parent, const char *name )
        : QVBox( parent, name )
{
    QLCDNumber *lcd  = new QLCDNumber( 2, this, "lcd"  );
    QSlider * slider = new QSlider( Horizontal, this, "slider" );
    slider->setRange( 0, 99 );
    slider->setValue( 0 );
    connect( slider, SIGNAL(valueChanged(int)), lcd, SLOT(display(int)) );
}

class MyWidget : public QVBox
{
public:
    MyWidget( QWidget *parent=0, const char *name=0 );
};

MyWidget::MyWidget( QWidget *parent, const char *name )
        : QVBox( parent, name )
{
    QPushButton *quit = new QPushButton( "Quit", this, "quit" );
    quit->setFont( QFont( "Times", 18, QFont::Bold ) );

    connect( quit, SIGNAL(clicked()), qApp, SLOT(quit()) );

    QGrid *grid = new QGrid( 4, this );

    for( int c = 0 ; c < 4 ; c++ )
        for( int r = 0 ; r < 4 ; r++ )
            (void)new LCDRange( grid );
}

int main( int argc, char **argv )
{
    QApplication a( argc, argv );

    MyWidget w;
    a.setMainWidget( &w );
    w.show();
    return a.exec();
}
    class LCDRange : public QVBox
    {
    public:
        LCDRange( QWidget *parent=0, const char *name=0 );
    };
The LCDRange widget is a widget without any API. It just has a constructor. This sort of widget is not very useful, so later on we'll add some API.
    LCDRange::LCDRange( QWidget *parent, const char *name )
            : QVBox( parent, name )
    {
        QLCDNumber *lcd  = new QLCDNumber( 2, this, "lcd"  );
        QSlider * slider = new QSlider( Horizontal, this, "slider" );
        slider->setRange( 0, 99 );
        slider->setValue( 0 );
        connect( slider, SIGNAL(valueChanged(int)), lcd, SLOT(display(int)) );
    }
This is lifted straight from the MyWidget constructor in chapter five. The only differences are that the button is left out and the class renamed.
    class MyWidget : public QVBox
    {
    public:
        MyWidget( QWidget *parent=0, const char *name=0 );
    };
MyWidget, too, contains no API except a constructor.
    MyWidget::MyWidget( QWidget *parent, const char *name )
            : QVBox( parent, name )
    {
        QPushButton *quit = new QPushButton( "Quit", this, "quit" );
        quit->setFont( QFont( "Times", 18, QFont::Bold ) );

        connect( quit, SIGNAL(clicked()), qApp, SLOT(quit()) );
The push button that used to be in what's now LCDRange has been separated, so that we can have one "Quit" button and many LCDRange objects.
QGrid *grid = new QGrid( 4, this );
We create a QGrid object with four columns. The QGRid widget automatically arranges its children in rows and columns; you can specify the number of rows or of columns, and QGrid will discover its new children and fit them into the grid.
        for( int c = 0 ; c < 4 ; c++ )
            for( int r = 0 ; r < 4 ; r++ )
                (void)new LCDRange( grid );
Four columns, for rows.
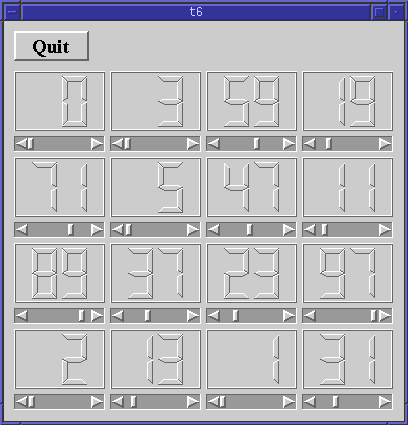
We create 4*4 LCDRanges, all of which children of the grid object. The QGrid widget will arrange them.
}
That's all.
This program shows how easy it is to use many widgets at a time. Each single one behaves like the slider and LCD number in the previous chapter. Again, the difference lies in the implementation.
Initialize each slider with a different/random value on startup.
The source contains three occurences of "4". What happens if you change the one in the QGrid constructor call? What about the other two? Why is this?
You may now go on to chapter seven.
[Previous tutorial] [Next tutorial] [Main tutorial page]
| Copyright © 1999 Troll Tech | Trademarks | Qt version 2.0.2
|