| Previous | Table of Contents | Next |
To create an alert, follow the steps presented in this section.
- 1. Make sure the default view, as shown in Figure 4.8, is set for an alert. If a different view is displayed, you can click the View The Alerts button on the toolbar, choose View|Alerts, or press Ctrl+A.

Figure 4.8 The Performance Monitor Alert view.- 2. Next, choose Edit|Add To Alert, press the Add Counter button on the toolbar, or press Ctrl+I. These actions will display the Add To Alert dialog, as shown in Figure 4.9. You can use the Add To Alert dialog to select the performance object counters to be monitored.
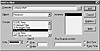
Figure 4.9 The Add To Alert dialog.- 3. Now, choose the event type (performance object) to be monitored in the Object field.
- 4. Next, choose the event subtype (object counter) to be monitored in the Counter field.
TIP: If you are not sure what the object counter is used for, click the Explain button. This action will expand the dialog and display a short description of the counter.- 5. Choose an instance of the object counter, if applicable. An instance differentiates between one or more occurrences of an object counter, and not all object counters include an instance number.
- 6. To specify a different color for the performance object counter to use for its display, select a color from the Color field.
- 7. In the Alert If field, choose either Over or Under, and specify a value in the data field for the alert condition. For example, if you want an alert sent when your disk drive has less than 10M of free space, you would choose the LogicalDisk object, the Free Megabytes counter, and the Under radio button, and you would specify the value as 10.
TIP: To specify a free space alert condition for multiple instances (like two or more logical disks), select a range of instances by highlighting the first instance in the range, then, while holding the Shift key, select the last instance in the range. To select a noncontiguous range, select the first instance, and then, while holding the Ctrl key, select other instances. The Performance Monitor will automatically select a color for each instance.- 8. In the Run Program On Alert field, you can specify a command line to be executed either every time the alert condition is met or only the first time the alert condition is met, by enabling either the Every Time or First Time radio button.
TIP: The Run Program On Alert option is particularly useful if you have a pager and a command line program that can be used to dial up your pager and send you a notification message.- 9. Once you have made your choices, press the Add button to add the object counter to the Performance Monitor’s display list.
- 10. Repeat Steps 2 through 9 for each object counter to be monitored. When you have finished, press the Done button to return to the Performance Monitor Alert view.
- 11. To modify the alert configuration, choose Options|Alert. This action will display the Alert Options dialog, shown in Figure 4.10. You can use the Alert Options dialog to select the following items:
- • Switch To Alert View—This option automatically switches the Performance Monitor to the Alert view when an alert condition is met.
- • Log Event In Application Log—This option logs an alert condition in a computer’s application log.
- • Network Alert—This option broadcasts a message to domain users specify ing an alert condition. To send a message to a specific user, enter a name in the Net Name field. This name can specify a name from a different domain by prefacing the user name with the domain name (DomainName\UserName).
- • Update Time—This item specifies the alert update interval. You can specify an automatic update interval by specifying a value (in seconds) for the Periodic Update option or a manual alert update interval by choosing the Manual Update option. If you select the Manual Update option, the alert conditions will only be checked when you choose Options|Update Now, click the Update Counter Data toolbar button, or press Ctrl+U.
- • Log Event In Application Log—This option logs an alert condition in a computer’s application log.
- 2. Next, choose Edit|Add To Alert, press the Add Counter button on the toolbar, or press Ctrl+I. These actions will display the Add To Alert dialog, as shown in Figure 4.9. You can use the Add To Alert dialog to select the performance object counters to be monitored.
)
)
)
Figure 4.10 The Alert Options dialog.
It is a good idea to save your alert settings by choosing File|Save Alert Settings As and specifying a file in which to save your settings.
| Previous | Table of Contents | Next |