| Previous | Table of Contents | Next |
Searching The Registry
The hardest part about working with the registry is finding the proper key, data, or value entry to change. You can expand the entire registry tree and examine each individual key, data, and value entry until you find what you are looking for, but this is very time consuming. To avoid having to do this, you can use the registry search command. Unfortunately, the REGEDT32.EXE implementation will only compare registry keys and subkeys. This is why I recommend that you use the 32-bit version of REGEDIT.EXE to search the registry as it will search all registry components. To do so, just follow the steps presented here:
- 1. Select Start|Run from the taskbar.
- 2. When prompted to open a program, folder, or document, specify REGEDIT.EXE, and click OK.
- 3. The Registry Editor will appear.
- 4. If not already highlighted, select the My Computer entry to highlight it.
- 5. Choose Find from the Edit menu, or press Ctrl+F, and the dialog box shown in Figure 13.5 should appear.
- 6. Specify the text to search for in the Find What dialog box.
- 7. Enable the Keys checkbox in the Look At group to search through all registry keys and subkeys for a match.
- 8. Enable the Values checkbox in the Look At group to search through all registry value entries for a match.
- 9. Enable the Data checkbox in the Look At group to search through all registry data entries for a match.
- 10. Enable the Match Whole String Only checkbox to limit the result to entries that include the entire search string.
- 11. Click the Find Next button to start the search.
- 2. When prompted to open a program, folder, or document, specify REGEDIT.EXE, and click OK.
)
Figure 13.5 Searching the registry.
The Find dialog will appear and provide an opportunity to stop searching by pressing the Cancel button. When the Registry Editor finds a match, it will highlight the matching value. If the result is not quite what you are looking for, choose Find Next from the Edit menu or press F3 to continue searching the registry from the last matching value. If no match is found, a message box will appear informing you that the Registry Editor cannot find a match.
Restricting Access To A Registry Key
Just as you can set permissions on directories or files with the Windows NT Explorer, you can set permissions on registry keys, values, or data entries to prevent unauthorized access. You cannot, however, just select the root key HKEY_LOCAL_MACHINE, and cascade your permission settings on the entire registry in a single step. To do so could prevent the operating system or a subcomponent from accessing a required key, value, or data entry causing it to fail to execute. This could leave you with no option but to restore the registry from a known good backup of the registry. Should you not have a good backup, your only recourse would be to completely reinstall Windows NT Server. Therefore, you should limit modifying the permissions on registry keys, values, and data entries to only those areas where you must restrict access. To do so, follow the steps presented in this section.
TIP: Before you change any permissions on a registry key or value entry, you should back up your registry as specified in this chapter’s section titled “Repairing A Damaged Registry,” just in case you make a mistake.
- 1. Select the registry key you wish to restrict access to, and choose Permissions from the Security menu.
- 2. The Registry Key Permissions dialog box, shown in Figure 13.6, should appear.
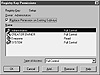
Figure 13.6 Setting permissions on a registry key, data, or value entry.- 3. Enable the Replace Permissions On Existing Subkeys to cascade your permission settings to all subkeys contained within the root key.
- 4. Click the Add button to display the Add Users And Groups dialog box to specify the users or groups that will have access to the specified key(s).
- 5. Once you have completed adding users or groups, click the OK button to close the Add Users And Groups dialog box and return to the Registry Key Permissions dialog box.
- 6. Select the appropriate user or group in the Name list box, and choose an entry from the Type Of Access drop-down list box. The available entries include the following:
- • Read—Specifies that the selected user or group will have read-only access to the registry key(s).
- • Full Control—Specifies that the selected user or group will have full access to the registry key(s).
- • Special Access—When selected, the Special Access dialog box, shown in Figure 13.7, will appear where you may specify either Full Control or Other. If you select Other, then you may specify the exact access the selected user or group will have to the specified access to the registry key(s) as follows:
- • Query Value—Specifies that the selected user or group has the right to read the selected value entry.
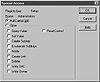
Figure 13.7 Specifying special access permissions on a registry key.- • Set Value—Specifies that the selected user or group has the right to write to the selected value entry.
- • Create Subkey—Specifies that the selected user or group has the right to create a new subkey.
- • Enumerate Subkeys—Specifies that the selected user or group has the right to identify all subkeys and value entries of the selected key entry.
- • Notify—Specifies that the selected user or group has the right to receive notification events when auditing changes to the registry.
- • Create Link—Specifies that the selected user or group has the right to create a symbolic link to the selected key or value entry.
- • Delete—Specifies that the selected user or group has the right to delete the selected registry key or value entry.
- • Write DAC—Specifies that the selected user or group has the right to set a discretionary access control (DAC) list on the selected key or value entry. This option is used to specify which users or groups can modify the permissions of the specified key or value entry.
- • Write Owner—Specifies that the selected user or group has the right to take ownership of the selected key or value entry.
- • Read Control—Specifies that the selected user or group has the right to read the permissions already set to the selected key or value entry.
- • Set Value—Specifies that the selected user or group has the right to write to the selected value entry.
- • Full Control—Specifies that the selected user or group will have full access to the registry key(s).
- 7. Click OK after you have specified your Special Access permissions to return to the Registry Key Permissions dialog box.
- 8. Repeat Steps 6 through 7 for each selected user or group.
- 9. Then, click OK to assign the selected permissions to the specified registry key(s) and value entries, and return to the Registry Editor.
- 2. The Registry Key Permissions dialog box, shown in Figure 13.6, should appear.
)
)
Even as an administrator, you cannot view the SAM and SECURITY keys because you do not have sufficient access rights. If you are curious about these keys or need to modify them, DO NOT USE the Security|Ownership menu option. This will prevent the operating system from accessing these keys and will cause a boot failure the next time you restart the computer. Instead, use the scheduler service to launch the registry. The command to perform this task isAT TIME /INTERACTIVE %SystemRoot%\System32\REGEDT32.EXEwhere TIME is the current time plus one minute. This will allow you full access to the associated registry keys by launching the Registry Editor using the SYSTEM security context.
| Previous | Table of Contents | Next |